Sunday, 6 April 2014
GC2: Mask Research

The characters I am designing a mask / head dress for are the hyenas. I have researched the characters and pictures are below. Hyenas are the primary enemies of the lions in The Lion King. In spite of being perceived as antagonists, they are very popular favourites among fans and are appreciated for their humor and foolishness. The hyenas are a light brown in colour; they have pale underbellies, black paws, black outer ears, black hair. Some have spots along their back. Most have rounded ears, though some have pointed ears, such as Shenzi, Banzai, and Ed.

Materials for this mask I would need = black felt, black lace, black thread & thin wire.

These are my initial sketches for the hyenas that I will be making for The Lion King. Using the appearance of the 3 in the film, Ed, Shenzi and Banzai, I copied the style of their ears as they are all different. This will make each mask unique and represents each hyena as an individual character.
I also looked for any other features that I could use for my mask, without covering the face - this can be done through the use of face paints. Therefore I did not have to worry about the facial features, so I took the ears and their fur - they have black fur running down the centre of their back/ neck - similar to the style of a Mohawk. I think I will adapt this to my masks and create it using black felt. This is evident in my sketches on the right.
I want to keep my mask simple because the less materials I use the easier it will be to construct and the stronger it will be. I think I have picked good features to highlight : the ears and mohawk / hair.
I think black felt is good for the mohawk because it can be easily cut / shaped and if attached correctly, it will be strong enough so the child cannot break / deface it. Black lace as in the photo above is good for the ears because it gives a hint of detail and looks good. I could use felt around the outline of the ears to resemble fur. Wire provides strong support so they do not fall. I would use this over felt or any other material because it ensures there is minimal movement and can hold a specific shape.
Masquerade Mask:


I really like this theme because it is bright, colourful and interesting. I think it will be simple to make. I just need paints / spray paint. And hopefully some thin (netted) material for the head piece (Hijab) If I could stick small jewels across the forehead, like in one of the pictures above, I will do this also.
GC3: Design Methods
If the mask could cover the child's face, I would make the tongue for Ed as it is an outstanding feature that makes Ed unique. However instead I will make the hair on top different for each one so that they are not all the same. I also noticed by looking at the pictures that the hyenas have mohawks. I could make this and incorporate it into my design. As for the colours, I think if I follow the example set in the Lion King, I will pick dark colours such as black, brown and grey. Real hyenas are lighter in colour but I think the characters will stand out and be recognised better if I stuck with the Lion King itself.
I want to keep my mask simple because the less materials I use the easier it will be to construct and the stronger it will be. I think black felt is good for the mohawk because it can be easily cut / shaped and if attached correctly, it will be strong enough so the child cannot break / deface it. Black lace as in the photo above is good for the ears because it gives a hint of detail and looks good. I could use felt around the outline of the ears to resemble fur. Wire provides strong support so they do not fall and I can also use it for the mowhawk. I would use this over felt alone or any other material because it ensures there is minimal movement and can hold a specific shape.
Sowing will be an important part of making my mask. This is because it is the most effect way to ensure the mask holds and does not fall apart. If done correctly, this will hold better than a glue gun would do because I am using fabric materials. If I were using cardboard, paper or wood, a glue gun would be more appropriate. I had to ensure the mask was child proof, e.g. no open ends of wire. I used extra material to ensure the mask was fully covered. When I had finished wrapping and sowing the material with a needle & thread, I pulled gently to ensure it was secure. 9/10 times it stayed which meant it was safe. If it was not, I would simply re do the part.
In addition, as a child would be wearing this headband / mask, comfort was important. I wrapped grey wool around the headband at the start, which gave a soft fit. The grey wool was more appropriare than the black felt because, looking at the colours on the hyenas in the film, grey seemed more suitable and broke up the darker colour (black.) it looked more realistic. When I added the wire, I wrapped black felt underneath a few times and ensured that that looked equal and was comfortable also.
As for the masquerade mask, I will need to use techniques such as paper mache, plastering, sanding down, painting and potentially sowing. Paper mache is important in the early stages of making the mask because it ensures the mask is strong enough to support the plaster, which is the following step. Several layers will be applied because the more there are the stronger and less frail it will be and the less likely it will be for the mask to break. It is a simple method which must be done delicately in order to not burst the balloon the mask will be supported by.
Plastering is important also as it is what will hold the mask and form the shape / density. The final step to securing the mask is the plaster. It must be smooth to ensure a smooth, equal mask is formed and a few layers must be applied before it is left to dry. This will reduce the risk of cracks forming and avoids any fragility. I will use plaster over mod roc because the surface is normally crumbly so if I were to paint over it, it would rub off easily. Also, mod roc is usually used for bigger surfaces, as my mask is small, plaster is more suitable.
Following on from this, I may need to sand down my mask to even out any rough or bumpy patches. I will do this in one direction to protect the mask from getting damaged. I will go around the edges also to make that even and smooth. This will make it easier to paint over also and will give a nicer finish to my mask.
Painting / decorating is the final stage to making my mask look how it should. I hope to use spray paint to cover the mask because it is quick and easy. I want to use it instead of normal paint because it takes less time to dry and gives a good over all coat without any marks or paintbrush streaks. It is also cheaper than buying gold paint, which is also not a colour that can be made by mixing different colours together.
As for the decoration, I may need to use thread and a needle to sow sequins onto some material, depending on what I can find. This will be for the Hijab (headdress.) I think this is a cheaper alternative than buying material already made. I will also need to stick down coloured gems, for the Hijab and around the eyes of my mask. I think a glue gun will be the most effect method because it is strong and there is less chance of the gems falling off.
GC4: Mask Step-By-Step Guide
The Lion King

1. Start with a head band, the thicker the better as it will be more comfortable for the desired person wearing it.

2. Wrap wool around the band starting from the bottom on the left. Ensure it covers the entire band and repeat this 3-4 times for added comfort. When completed, secure with thread and stitch it as close to the bottom as possible.

3. Next, add the wire and wrap around the centre / top of the band ensuring that the end is facing upwards, not on the inside / underneath because this could injure the user. Secure tightly using thread and stitch underneath the wool to fasten to the band itself.

4. Spread out the pieces of wire so that they are not too close together, so that is resembles a mohawk.

5. Using one long strip of black felt and a black pipe cleaner, wrap the felt around the pipe cleaner as demonstrated in the image above. For more security, use black thread to stitch around the black felt and pipe cleaner. This will prevent any unwinding of the twists. Do not only use a pipe cleaner without the felt because it is not strong enough to support itself / stay upright.

6. Attach the 'ear' to the head band by taking the band from the front and wrapping the end of the felt/ pipe cleaner underneath until the end rests on top of the band. Secure by stitching all the way around, including the top of the band. The more secure it is the longer it will last. Ensure it is secured as tightly as possible.

7.To add to the mohawk effect, wrap thin strips of black felt around each piece of wire individually. This will ensure it is child-friendly and look better to the audience's eye. The ends of the wire can be tricky to secure. Therefore more felt may be required. Stitch around the felt to fasten it to the wire properly without it coming loose.

8. It is important that the felt for the mohawk is fastened tightly to the headband otherwise it will fall apart. Using the stitching technique, black thread will hold it together. Use as much as is required. Pull gently to assess how secure it is. To tidy it up, wrap a strip of black felt equally across the centre.

9. To develop the ears even further, brown felt can be added. Without it the headband looks too plain. Cut out the brown material to fit the size of the inside of the ear. Stitch from the back of the black felt/pipe cleaner through to the front to give a tidier appearance.

Masquerade Mask
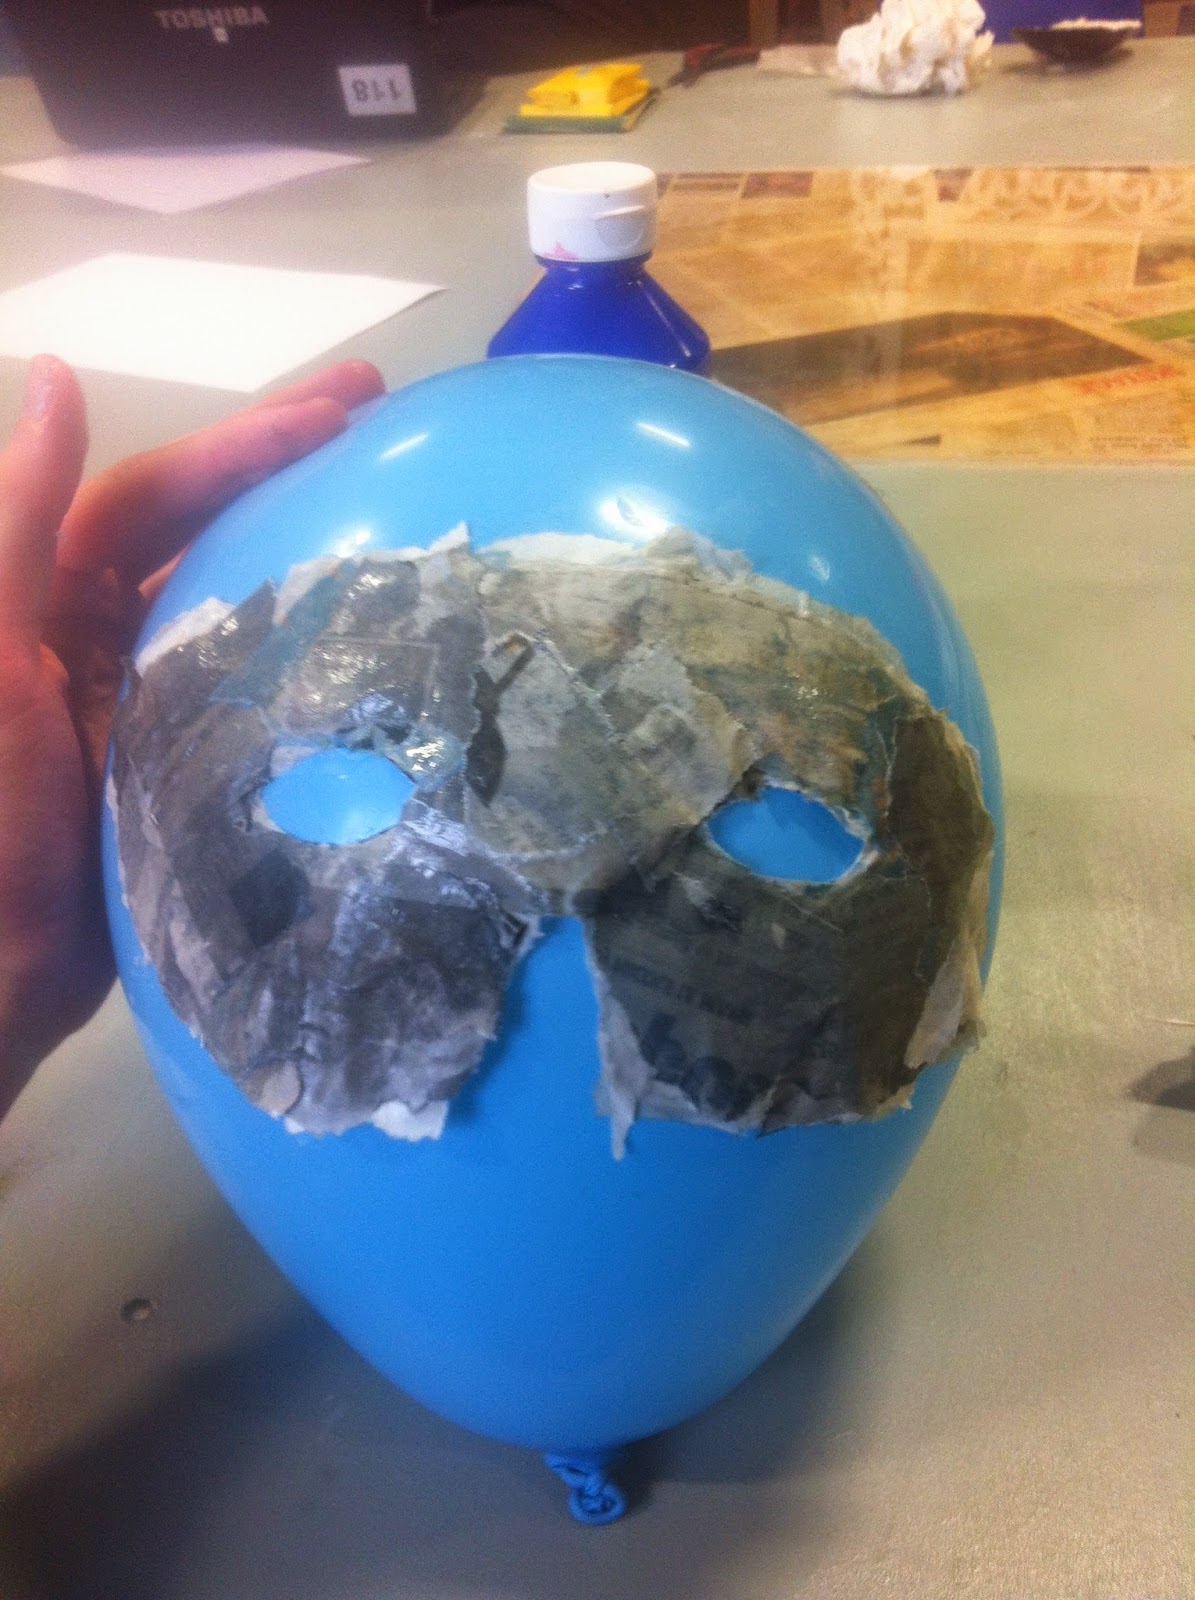
1. Print out a masquerade mask from google, using Microsoft Word to determine the size. Print it out when it is approximately the size of an adult's face / eyes. Cut it out and blow up a balloon.

2. Using water, PVA Glue and pieces of newspaper / thin paper, paper mache the mask on the balloon. Cover the mask with approx 8-9 layers of paper and allow to dry. The more layers the stronger it will be. Be gentle as to prevent the balloon from bursting.

3. When the mask is dry, slowly peel off and detach from the balloon.

4.Begin to plaster in order to strengthen it and ensure it is even to produce a smooth mask. Allow to dry.

4. Decorate the mask using silver spray paint, ensure this is done outdoors because the fumes are dangerous.

5. Once dry, attach the gems using a glue gun in the pattern you wish and using a black sharpie pen / black paint, highlight the outline of the eyes.

6. Attach the material to the back of the mask as demonstrated below. Use a glue gun because it is the strongest method. Then fold the material back over the front of the mask.

7. Once the material is secured, decorate it with Bollywood styled patterns to promote the theme with a gold / silver marker pen.

GC5: Final Constructed Masks

This is my final Hyena mask. I think overall it turned out as I had originally planned. Although a few changes were made. I did not end up using the fluffy fabric material because it did not stay tight. Another change / addition was the brown felt for the inner ears. I added this because without anything there, it looked incomplete, dull and empty. I was happy with the final product because I think it is relatively similar to the character I was creating and was definitely durable and perfectly safe to prevent any injuries. The mask is similar to my original design but not exactly the same. The difference is the Mohawk down the back. It was not as long as I had originally thought it would be but the way it was in the end worked better I think and was simpler and stronger as a result.

This is my completed Masquerade Mask in the style of a Bollywood dancer. I think the end product was exactly what I had intended it to be, with a couple of improvisations, e.g. decorated the material as I could not find any small enough pieces pre-made and at a reasonable price. It also looked too plain without any designs, which does not complement the Bollywood theme.
I had also considered painting the mask gold, I think if I had saved enough time I would have used gold but because I did not have much time left and only silver was available, I chose differently. I still think it works however and the coloured gems and material suit it better that they would gold. If I had gone for the gold, I think a more pink material would have been a better idea with green and red gems.
Over all I am happy with the final outcome. It was not like the original design because I had rushed the final couple of stages. If I had more time, I would have concentrated on the decoration and have made more effort with the material to make it look more like a Hijab seen in my moodboard. I would also have done more with the outlines of the eyes, using different colours to make them stand out.
Subscribe to:
Comments (Atom)